Do you find yourself repeatedly typing out the same text in Salesforce? Then you might consider using the Salesforce Quick Text feature to save all that time and tedium! Quick Text are small, pre-written snippets of text you can drop into emails, events, call logs, etc. In addition, the variables resolve when you use a Quick Text so you can edit and tweak things easier.
Keep reading to learn how to set up a Salesforce Quick Text and see an example of Quick Text being used to help populate an email.
Creating a Salesforce Quick Text
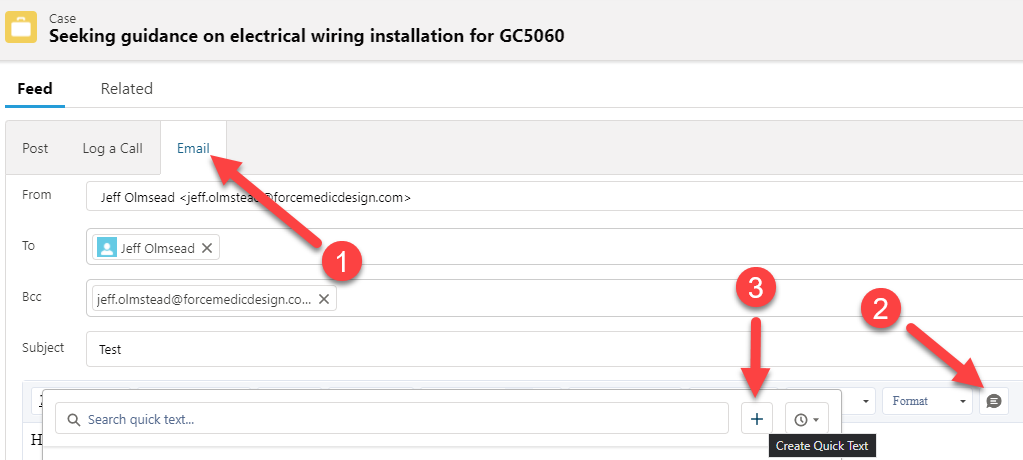
When you open a case, you make it a practice to notify the contact that you are “working on it” right? Yeah, you could ask the Salesforce Administrator to put some type of flow in place, but you like the ability to be in control and customize the notification a bit if needed. So, today is the day to get some Quick Text in play. The easiest way to get started with Quick Text is to begin where Quick Text can be inserted. In this instance, that’s a “Case” record:
When you click on the “Quick Text” icon (number 2 above) you can hit the “+” icon to create a new Quick Text. It is easy to start, just fill out the form:
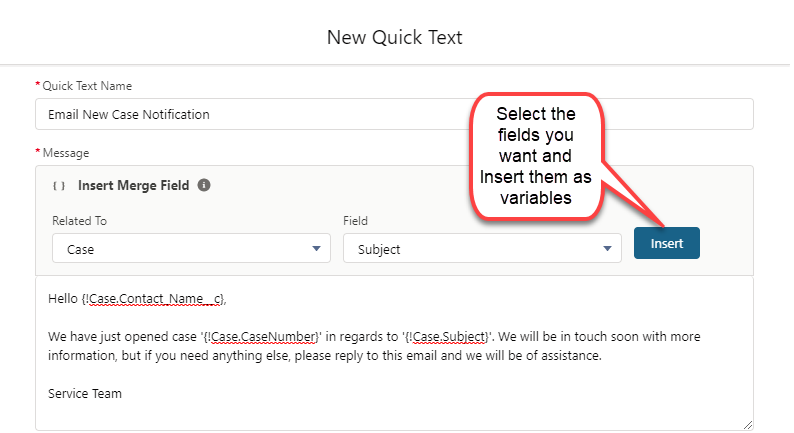
Adding Variables
You can inject variables into your Quick Text as well, just be sure to keep everything related to the same object type (i.e. “Case” in this example). Note that the field must exist on the object to be able to use it.
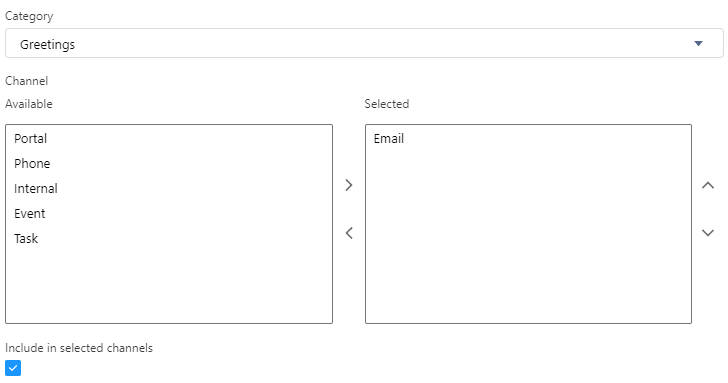
There are other options below, especially “Channel”, that let you select where you want this Quick Text to be allowed:
By default, it has selected “Email” since that is where I started from. If you have a generic “Quick Text” you might allow it in many places. Once done, click on “Save”.
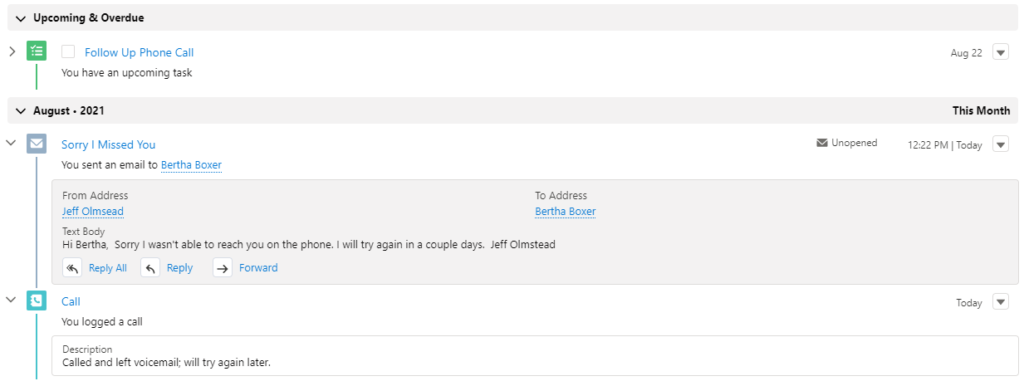
Consuming Quick Text, One Bite at a Time
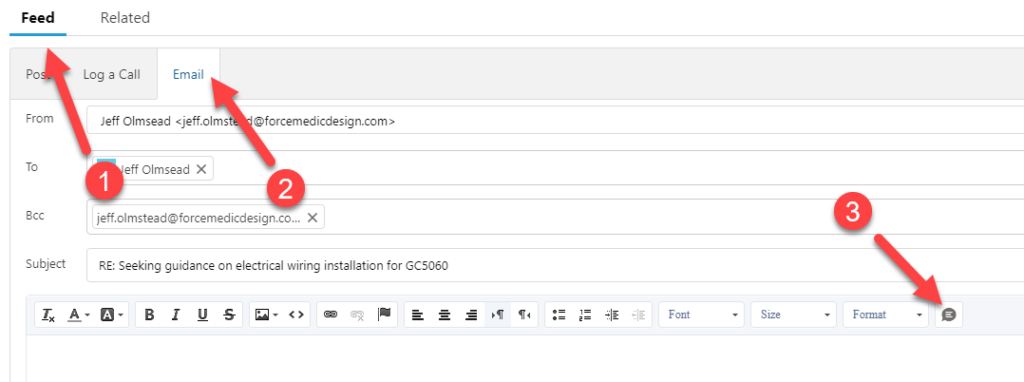
To consume your Quick Text, you start out on a field that supports quick text (such as a Case email):
Then, you just pick the Quick Text you want from the list:
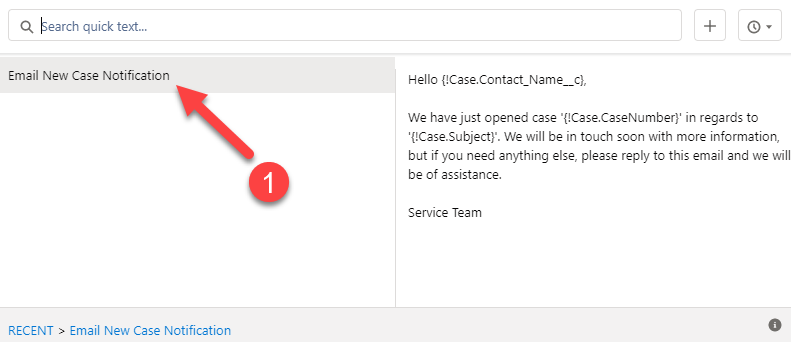
Inserting the quick text immediately resolves the variables. You will see:
Handy, right?
Is there More?
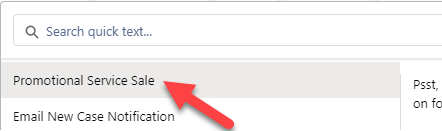
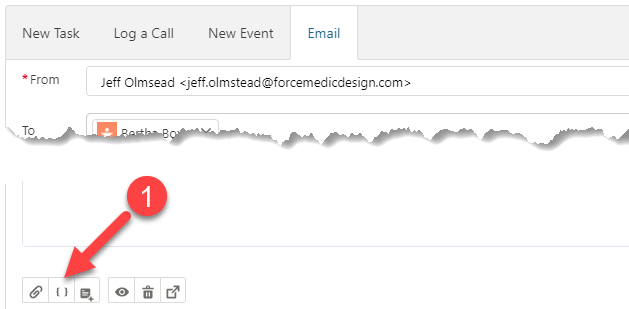
Don’t be confused though, you do NOT need to use it for the full body. Or, put differently, you can add even more via Quick Text. I hprepared a simple paragraph Quick Text for a promotion that I want to inject into the above email before it is sent. So, just put the cursor where you want it and choose your Quick Text:
And you will now have your final email! You can now do some light editing and send it off to the contact:
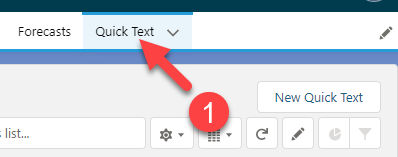
If you ever want to see / edit all your Quick Text, you can add it to your navigation:
Until next time, may the (Sales)Force be with you!
Recently, our team shared how to use Split View on lists. As cool as it is to have a Split View in place, however, what if you have way too much data that isn’t really relevant to what you need right now? Wouldn’t it be even better to have a filter in a Salesforce list to break it down to what you want? Maybe have your own personalized list view? It would! And this article will show you how, step by step.
Setting up a Filter in a Salesforce List
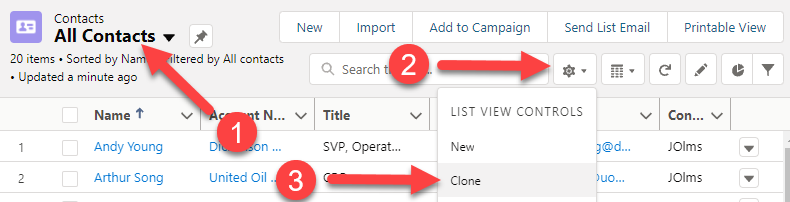
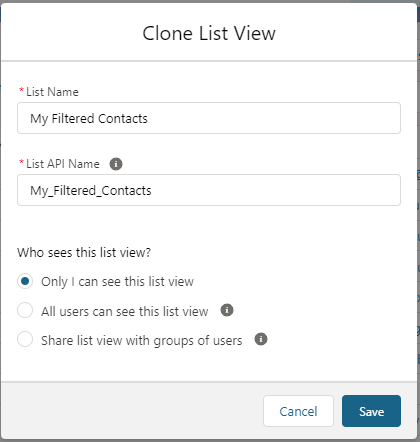
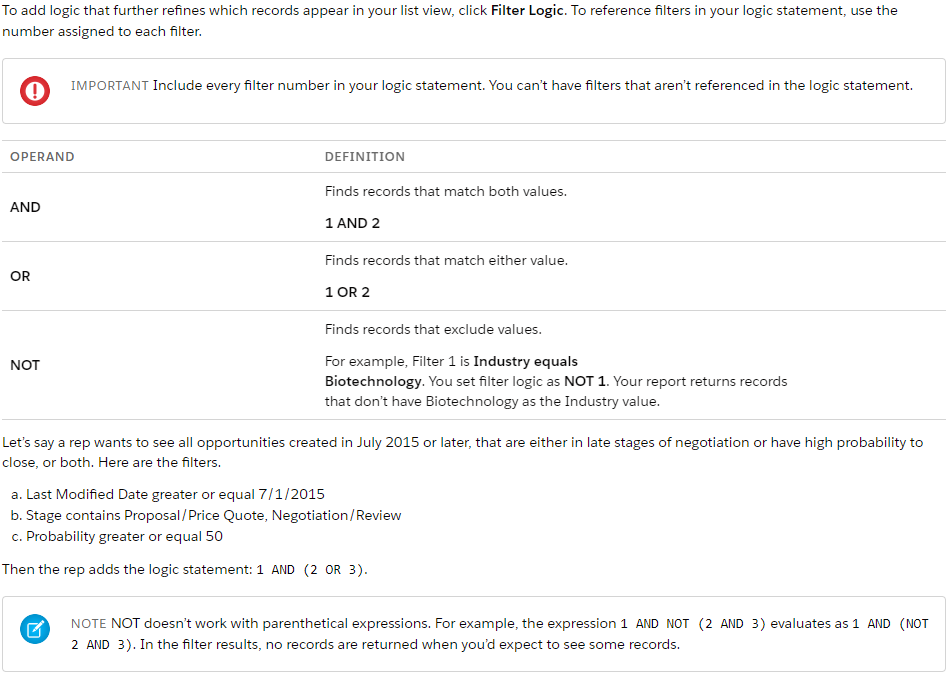
For our example today, let’s prepare a list of filtered contacts. The easiest way is to start with an existing list, in this case, “All Contacts”, and click on Settings, then Clone:
Fill in the popup form with a List Name and decide who can see this list view:
I have selected that “Only I can see this list view”. You might really want to share how awesome this list view is with everyone, but please don’t choose “All users can see this list view”. Not everyone will appreciate you cluttering up their list view options, and it will also make the list view available to Experience users (i.e. Community users). If you really want to share the love, use the last option, “Share list view with groups of users,” and pick all your favorite people.
Show Me the Filters
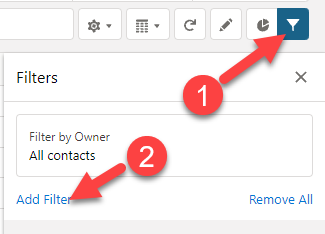
Ok, I know you are getting excited now. On the right sidebar you will see “Filters” (if not, just click the funnel-shaped icon). There is one existing filter there. You can edit it to filter down to contacts that you are the owner of if you like. Beyond that, to add a new filter (and I know this is tricky) just click on “Add Filter”.
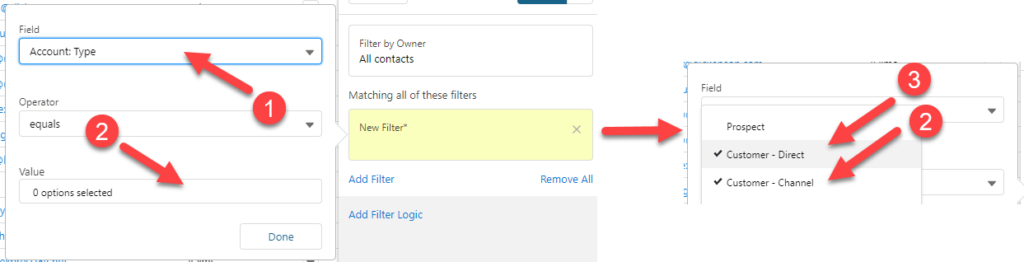
For this example list of contacts, I want to pull in those that are of the “Customer” types. I can simply click to select both of them:
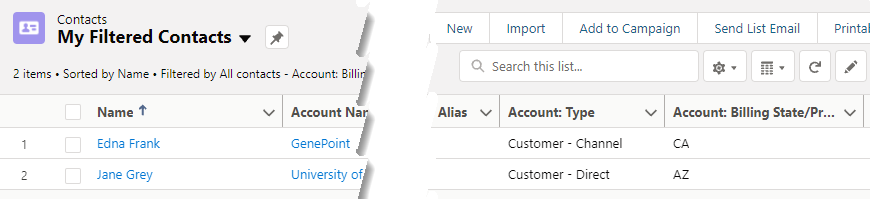
I would also like to filter down to only contacts where the billing state is Arizona or California. Billing State is a text field, so we will need to add two filters to accomplish this: one for Account: Billing State/Province equals AZ, and one for Account: Billing State/Province equals CA. Right now this will NOT produce any results because, by default, it is looking for all these criteria and an Address State cannot be both AZ and CA at the same time. To adjust for this, we will have to “Add Filter Logic”:
Show me the Filter Logic
Take it easy, we’re getting there! When you click the “Add Filter Logic” link, as you see above, you will then see this:
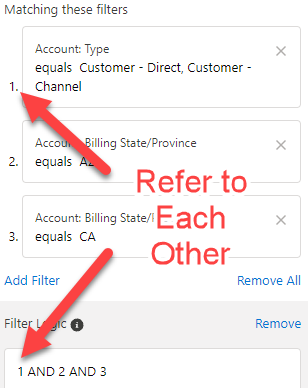
As shown above, the number 1 on the list view represents the same number 1 in the Filter Logic. In our case, we want 1 to always be true but 2 and 3 can be either or. To accomplish this we use the following Filter Logic:
1 AND (2 OR 3)
I can hear some of you already: “This is starting to feel a bit like coding!” But don’t worry, you’ll get a handle on it quickly. Salesforce has more information on it too. Here’s a screenshot:
Once you have your Filter Logic as you want, click “Save” and see the results. I have exposed the relevant columns here so you can see the filters at work:
BONUS Filter in a Salesforce List
As a bonus, for the above example where I used Filter Logic, you could also use comma separated variables to accomplish the same thing:
Now that you can use split view AND customize a filter in a Salesforce list, you have a powerful one-two punch that will boost your efficiency and decrease frustrating clutter in your Salesforce views.
If you’ve found this helpful, the Forcemedic team would love to help you learn even more about using your CRM platform and building and customizing it to fit the needs of your organization. Give a shout with the contact button at the bottom of the page!
Ever have those moments in Salesforce where you find yourself doing something you did 5 minutes ago? Open new record, click, type, save, repeat… yawn. If only there was a way to automate it! Sure, those administrators could take care of this for you, but you hate to interrupt them when you know they’re busy building their kingdom in Minecraft. Besides, you’re a Salesforce super user. You’ve got this! You can solve this problem when you create a macro in Salesforce.
Hello Macro: Automating Manual Processes
It is time to kick it up a notch and automate those repetitive tasks. If a task is one you do on-screen, a macro may be a good fit for you. While you can’t automate actions in list views (yet) you can automate most record details.
WARNING:The content you are about to read may leave you excited and passionate. Please use caution when expressing your enthusiasm.
Today we will use the classic example of working a Lead to introduce you to macros. Head over to your Salesforce instance, navigate to a Lead record, and get ready to begin!
In this example we are trying to automate the process of:
1. Logging a call was made into a Lead
2. Scheduling a follow-up task to call the Lead back in 3 days
3. Sending an email to the Lead letting them know we tried to reach them
Creating Your First Macro
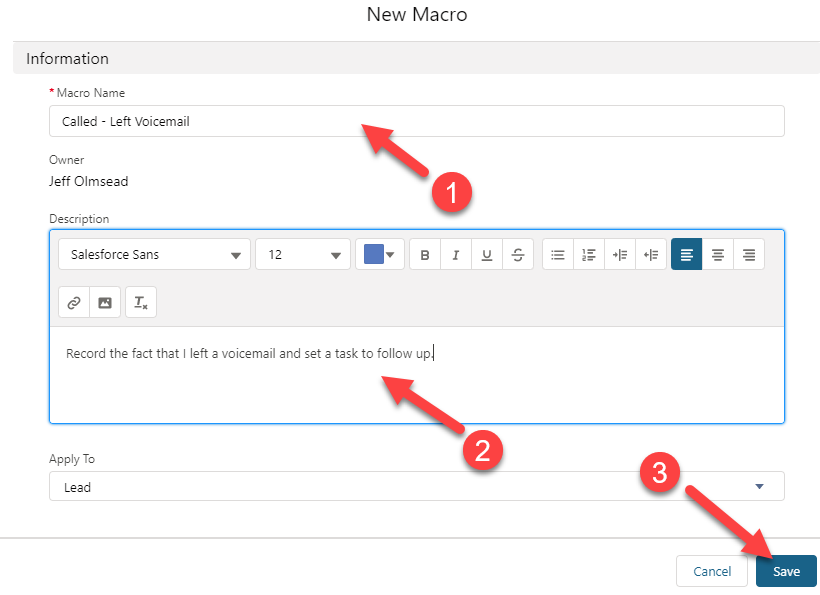
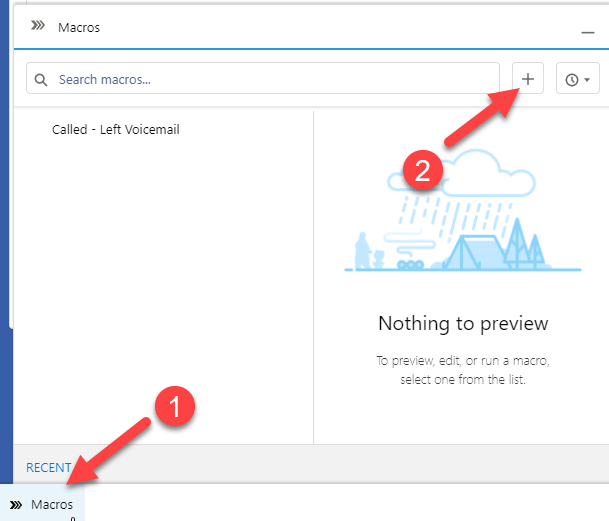
The Utility Items (i.e. the bottom navigation bar) in Salesforce is where you will find your “Macros” link. Click on it, then press the “+” icon to fire up a new macro.
If you don’t see a “Macros” link it is because the Admin didn’t add it to your app. Unfortunately, you’ll have to submit a request to have it added and start making macros later.
If you were able to find your “Macros” link, sweet! We’re getting there. Fill out the form and save. Woohoo! Your first macro is born, but it doesn’t do anything… yet.
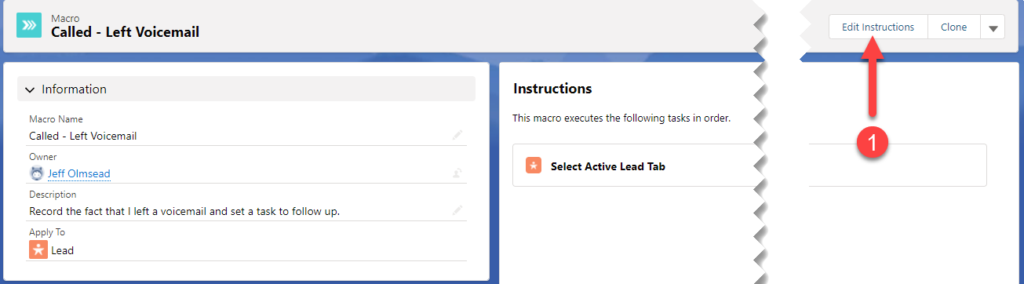
I Have a Macro, Now What?
The next screen is the only tricky part because it leaves you wondering “now what”. But you are a Salesforce super user, so be brave and click the “Edit Instructions” button:
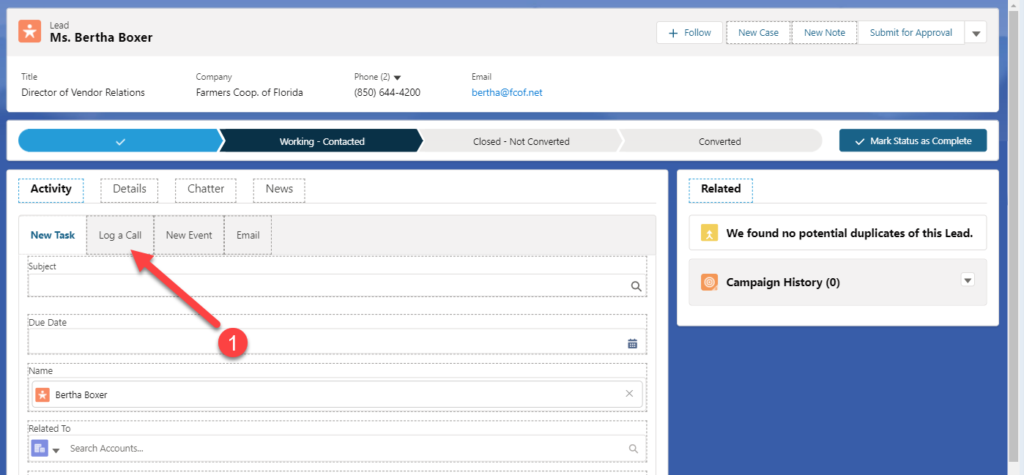
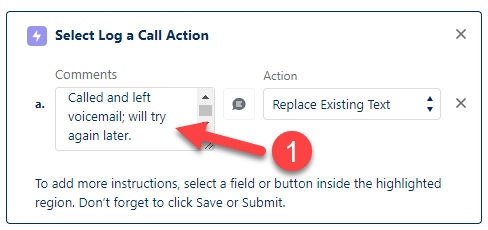
Wow, it took you back to the Lead we started from. How exciting! Ok, not really that exciting, but look carefully, everything is outlined with dashes now. Let’s click on “Log a Call”:
You will notice some activity on the right-side bar but let’s keep chugging. Click on “Comments”:
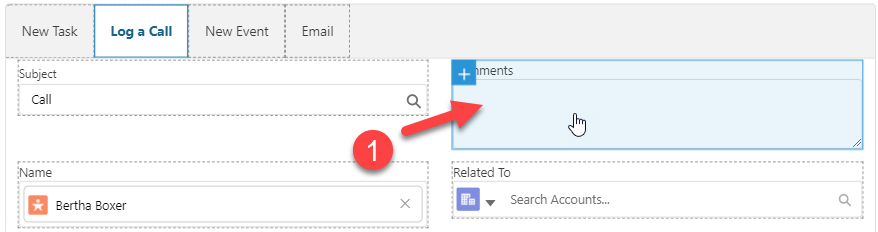
Over on the right-side bar you can see that an instruction was added to “Log a Call”. There is now a spot for you to enter in the “Comments” you want recorded:
Don’t forget to Save! Back on the Leads screen click “Save”:
Now of course, if you wanted your macro to stop BEFORE saving (say you wanted to add your own notes), you could have stopped there, but we want to be super users so, let’s automate it all!
Macro a Task
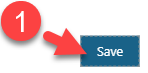
So, how do you think I was able to get this next instruction added?
Yup, I just clicked on “New Task” on my Leads form and filled it out. BAM! I now have a task (reminder) that will notify me in 3 days that I need to make a follow-up phone call.
Macro an Email
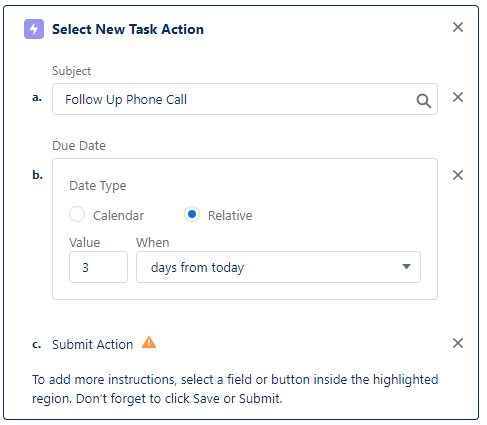
Could we have a macro automatically send out the email as well? I’m glad you asked. The answer is yes. Here are the instructions for that:
To pull that off I just clicked “Email” on my Leads form and filled it out. DOUBLE BAM!
You very attentive readers may have noticed I’m doing some magic by inserting the {{{Recipient.FirstName}}} merge field so it fills in with the person’s name when the email is sent. You can do that too! Prepare your template in regular mode and use the “Insert Merge Field” icon:
This will show you all the merge fields you have available and you can copy and save it over to your Macro (or if you are really cool you will use the Quick Text feature, but that is a future article).
Don’t be Slow, Save the Macro
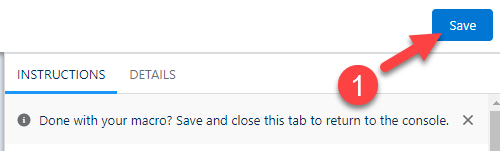
That is it; the three steps we wanted to accomplish for this Macro. Be sure and hit “Save” in the upper right-hand corner:
Go Macro Go
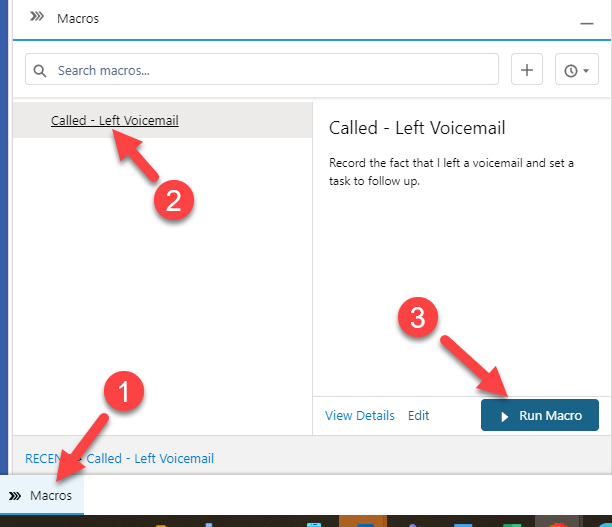
Now to put that macro to work! Head back to your Lead record (one that you don’t mind sending an email to), click on “Macros”, then click your newly created macro, and click “Run Macro”:
Holy Macro, It Works!
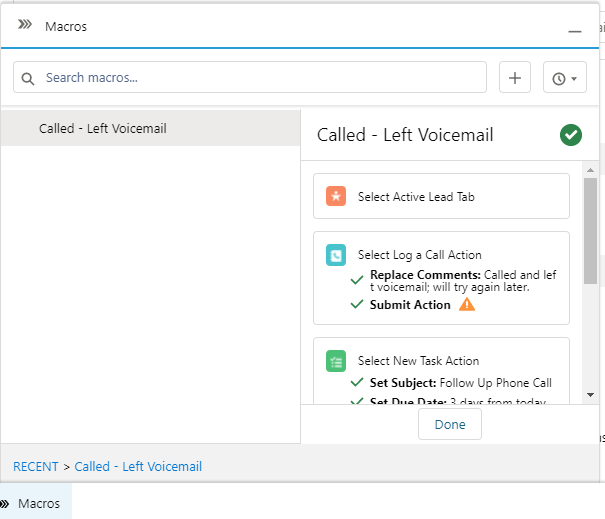
Right in front of your eyes you will see the Macro work and, if all goes well, green checkmarks everywhere.
Your “Activity” tab shows that you logged a call, created a follow up task, and dropped an email, with one click.
Congratulations on being a super user! Create a macro in Salesforce for each of your most frequently repeated tasks. It will help save loads of time and become even more efficient as you manage records. You can probably think of more tasks you’d like to automate with macros. We’ll continue to showcase some of the most useful macros in future articles but, until then, keep rocking!
Ever add a new option to your Salesforce picklist, navigate to a record, and don’t see the value you just added when you click edit? Being the awesome admin that you are, you of course clear the cache and excitedly await the page reload… but nothing, still the Salesforce picklist values are missing. Now what?
Locating the Missing Picklist Value in Salesforce
No, you don’t need to be a sleuth – this case will be resolved shortly. The thing to remember is Salesforce picklist values are controlled by Record Type. It is a beautiful thing really, this is what allows you to have the same field present different picklist values based on the record type.
Adding the Salesforce Missing Picklist Value
Let’s use an example of an Asset record type to clear this up. To resolve this, navigate to:
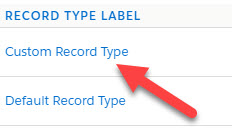
Setup –> Object Manager –> Assets –> Record Types
Then, pick the record type where you want the picklist values to appear and click on the record type label:
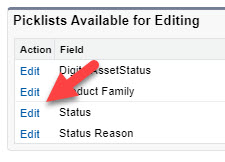
Then pick the “Picklist” you want to manage (in this case, “System Type”) and click “Edit”:
From there you can “Add” or “Remove” the values you want available for this record type:
Once done, just hit “Save”. Repeat this for every Record Type you want to manage the picklist options on.
Salesforce Missing Picklist Value Resolved
There you have it, you are back to being an awesome admin! You now have one more trick up your sleeves when you are missing a Salesforce picklist value.